Wednesday, June 27, 2012

Top 10 Tips to Save Electricity


Save Electricity


Saving electricity is always going to save you money - assuming you pay your own electricity bill - but in my case, the reward has been sweetened. 

Our electricity company is offering refunds on a certain percentage of your electricity bill, if you decrease your electricity usage compared to 2011.  So if we can get our electricity down by 10-30% as compared to last year, we will get money back! 

Sounds great... the tricky part is we have my sister and father-in-law staying at us, in the two guest bedrooms that weren't being used last year and that last year the house was empty when we went on an August vacation and this year there will be tenants.  Theoretically, I feel that I've always kept electricity usage somewhere in the back of my mind and so I really needed to search for the best top 10 tips out there, in order to rise to my challenge. 

Here they are:

1.  Don't use a tumble dryer: 

I've had a tumble dryer for the last 5 years and it has changed my life.  I love soft fluffy clothes and linen, I love saving time dealing with laundry.  However, after reading EVERYWHERE how much energy a tumble dryer uses, and having friends stare at me in shock when I tell them I use my tumble dryer in summer -  it became clear that this was going to be the core of my saving electricity mission.
So I hang up the laundry, instead of checking facebook for the millionth time, and I'm trying some new suggestions to keep my line-dried clothes from getting stiff.  I haven't used vinegar yet - that sounds scary.  I have cut the amount of detergent I use... I used to use double the amount recommended (I don't know why) so I'm on regular amount now and I may even go down to half.  I run the clothes in the dryer for 10 min before hanging them out and it does help (I still don't understand why nobody recommends the dryer AFTER hanging them out...).  I shake out the clothes before I hang them.  I do NOT wait for a windy day to hang them out ... how is that supposed to work? How do I know which day will be windy? and am I expected to leave them in the washing machine until this windy day dawns?

2.  Turn off the lights when you leave the room:
Save electricity with a timer
Duh!  Well actually I realised that we always leave a light on upstairs (we all sleep downstairs) when going to sleep so that there will be a little bit of light sneaking through the door of the kids' room and they won't be scared if they wake up.  I don't know why I never did this before, but I found a small lamp we weren't using and put it in the corridor outside our rooms on a timer.  Now it turns on when we go to bed, and turns off when it gets light in the morning.


3.  Don't leave mobile phones and laptops charging overnight:
I totally have a tendency to do that, in fact we often leave these devices charging on Saturdays, when we observe the Sabbath and don't use them at all, what a waste.

Save electricity by changing light bulbs
4.  Use energy saving light bulbs:
Most of our lights are already energy saving, but I do have a few more that need replacing.  In order not to be wasteful, my intention is to wait until the globes aren't working to replace them.  Is it hypocritical to wish that they stop working so that I can replace them before the summer's over?

5.  Wash clothes in cold water:
I almost never use a setting higher than 30 degrees, and after still managing to turn white shirts and socks pink, I'm happy to stick to the cold setting.

6.  Wait for a full load to run the dishwasher:
I would think that the recommendations would be to not use a dishwasher at all (although I know it does save water), but I'm not going to ask questions and enjoy my full-loaded dishwasher while I can.

close trissim and curtains to conserve energy
7.  Keep curtains closed:
By keeping your curtains closed, you decrease the sunlight that gets in and keep your house insulated, thereby reducing the need for the airconditioner.  We have 'trissim' which are like heavy metallic blinds that close on the outside of our glass doors - I can totally feel the difference, and can't believe I never thought of lowering these trissim before.

8.  Keep your thermostat at around 25 degrees celsius:
This is a constant tug of war with my husband, who will wake up in the middle of the night and turn the aircon down to 22, after which I wake up and turn it back up to 25.  The point is that every degree really counts, so if you need to compromise at 24, there's still a benefit.

9.  Don't leave electronics on standby:
multi-plug power strip
Microwaves, TV's, DVD players... and other appliances that either have a clock, or are standby ready to be turned on with a remote control... all use phantom energy.  Well, after reading this ghostly news, I went to do a search at home, and found that our desktop computer that we never ever use was plugged in, and using little bits of energy for no reason at all.  I've seen recommendations to plug all these items into a power strip and when you're not using them, turn off the whole strip.  So far, my challenge with this is when I turn off my strip with the tv, dvd and cable - it means the cable has to reset everytime we turn it on, so I need to do something about that before the whole family agrees to cooperate.

fluff filter
10.  Clean filters:
Cleaning aircon filters will mean more efficient airconditioning even at higher temperature settings (that is totally tried and tested in my house) and cleaning the tumble dryer filter (which I now use for only 10 minutes per laundry session as per tip no.1) reduces drying time.


Happy savings everyone.

Tuesday, June 26, 2012

My Take on Terracycle's Cigarette Waste Brigade

I'm a big fan of Terracycle - if you haven't yet heard about them, go check out their website
Recently they launched Cigarette Butt Collection & Recycling Programs in the US and Canada and I've seen some chatter as to whether or not this is a good idea.


SERIOUSLY?... Does anyone think it's not a good idea to clean up these cigarette butts that are littering and polluting our streets, parks, and stairwells?  The argument that providing a solution for cigarette butt waste encourages smoking is insane but not original.
As a doctor and a mom, I am very anti-smoking. 
I'm often warning smokers of the dangers their smoking poses to the health of themselves and their family.
 
I also warn against unprotected sex with multiple partners, while at the same time supporting free condoms and HPV vaccines.
I encourage obese patients with high cholesterol to exercise and lose weight, yet that doesn't stop me from prescribing cholesterol-lowering medication.
I tell patients with external ear infections to stop using cotton-buds to clean their ears (an unnecessary and dangerous habit), yet I still give them antibiotic ear drops.
 
So if, after counselling patients on smoking cessation, I can leave my clinic and pick up the hundreds of cigarette butts littering the stairwell (illegally), the sidewalk and the streets and have a great program to send them to;  that makes me a holistic healer, not a hypocrite.
 
You can read details about Terracycle's program on their brigade page, but the basics are that you collect cigarette butts, send them to terracycle, earn money for your charity and know that the butts are being safely processed and recycled into new products.

Saturday, June 23, 2012

How to turn a pink elephant party green

Since beginning my going green journey, I've done a lot of online research and found so many different ideas and challenges for leading a more eco-friendly life.  I'm especially attracted to the reduce, re-use and recycling concepts and feel that until now I've missed out the perfect opportunity to embrace these concepts - kids' birthday parties.

The most recent birthday party we hosted, was for my 4 year old.  I'm not a big fan of creating  themes for parties at this age, however, I am a very big fan of cakes.  Growing up, my mom let us choose an original cake from the Australian Weekly's original cake book for each birthday.  I have fantastic memories of my and my three sisters' elaborate (for that time) cakes; and I let my daughters choose their cakes from that book too.

Australian Weekly Cake


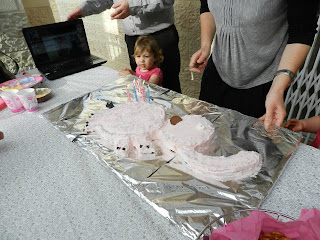
In April, 4 year old Eliya chose the pink elephant for her birthday cake.  It's probably my least favourite cake in the book, so I girled it up a bit when I did it, but it still resembles the picture in the book.  The rest of the party kindof fell into place around the cake.

1. Pink-ish decor. 
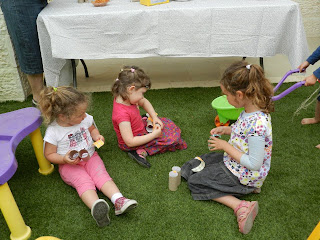
2. First activity: make binoculars out of toilet paper rolls.  I stapled two rolls together, and punched holes before the kids' arrived in hope of being organised.  I set out different crayons and pencils as well as stickers for decorating.  The kids then chose a pair of binoculars, decorated as they wished and chose a piece of pre-cut ribbon to thread in the holes and tie around their neck.
If you're wondering how this fits into birthday theme:- binoculars - safari - elephant

Activity Children's Party

3. Second activity: ice cookies.  I bought paper cookie 'plates' and after my cookie baking failed, placed a store-bought cookie in each 'plate'.  I then set out several bowls of different colored icing and bowls of decorative sprinkles and gave each child a plastic knife.  The kids loved decorating and tasting.  Please don't ask how this fits into birthday theme:- pink elephant - pink icing?


4. Pink Elephant Cake - see above.
5. Going Home Presents: plastic bags *wince* filled with binoculars, wrapped iced-cookies and a small plastic camera (if you look in the camera you see photos of animals -fits into theme:- pink elephant - safari - animal photos).


A happy birthday girl showing off her creations

And now, to answer the title of this post...
How would I turn this pink elephant party green?
1.  I would use far less disposables and try to use my real dishes, at least for the adults
2.  If I wanted to be adventurous, I could make the cookie plates from old cardboard/paper
3.  I would definitely not buy the goodie-bags, and either just hand out their gifts with no bags, or make an alternative.  I'm planning a future party where I fill a home-made carton wallet with sweets and give that instead of a goodie-bag.
4.  I think the cheap, plastic camera toy was unnecessary.

So hopefully, the next birthday party I plan and post will live up to my going green ideals.

Happy party-planning everyone

Monday, June 18, 2012

How to be productive with old birthday cards?

Are you a hoarder?
I'm definitely not a hoarder.
I just don't like throwing certain things away
In particular, sentimental things.
I especially don't like throwing away birthday cards. 

As a child, my mom kept all my birthday cards and glued them into a book for me.  I really enjoyed reading through those birthday cards for many years, until one day I decided to emigrate.  Moving countries, is a true hoarding/sentimental/prioritising test.  Before moving, I got rid of a lot of sentimental stuff that I really didn't need, I also kept a lot of sentimental stuff that I really didn't need.  Somewhere in the move I threw out my birthday card books.

The bonus in growing up and not having as many big birthday parties, is that I don't receive as many birthday cards, and I don't need to decide what to do with them.  My parents send me e-cards (which are GREAT ) there are personal messages, no carbon footprint, and I can just archive the link in my gmail.  That way, I never get rid of it, yet it doesn't take up any space. 

However, since having kids, the birthday card problem has returned.  Here are two of my solutions.

One:  Birthday-card decoupaged furniture.
Below is a pic of a wooden drawer set in my daughters' bedroom.

Here is a close up - you can see that I am in the ongoing process of using modge podge to decoupage their birthday cards (from their birth and first two years) onto the wood.  On the top, I also used pretty paper napkins over the birthday cards.  When I complete the decoupaging, I intend to paint over with varnish.


Two:  Framed Wedding Card Art


When given a wedding card, the meaning is not only in the words scribbled inside, but also the choice of the card design itself.  I cut out the designs from several of our wedding cards and placed them in divided frames to create a meaningful piece of art for our living room.


Something Different
The final project that I'm sharing, was actually designed by my mother-in-law and doesn't incorporate birthday cards.  However, it is in line with the theme of meaningful home decor.  My eldest daughter was named after my mother-in-law's parents and she collected several items from their home and had the items incorporated into a wall-hanging.

The general concepts in the design such as the blue birds, the cricket bat etc all have particular meaning.  Additionally, the flowers and trees were made with fabric from their curtains, pieces of clothing were used for the little girls' dress, and badges were incorporated into the balloons.  My daughter now has a piece of art that tells her a story about her great grand-parents for whom she was named.


Happy crafting everyone, and please share more ideas for meaningful home decor.

Thursday, June 14, 2012

How to upcycle a juice carton

Milk and Juice cartons are unfortunately (at least where I live), unrecyclable.  I try to buy these items in alternative, recyclable packaging, however I still do end up with quite a few cartons.
Disney Family Fun has a really cute video tutorial on how to make a wallet out of these cartons. 
So voila !
... here's my first upcycled juice carton wallet

Juice / Milk carton wallet

For instructions, and a link to the wallet template click here.
but here are some of my own tips
1. watch the entire video before you begin - my first attempt I skipped a detail and cut off the entire top
2. rinse out your carton first - unless you particularly want a mango-fragranced wallet.
3. if you have more than one child, make more wallets, my kids loved the wallet and didn't want to share.
3. if your cartons are smaller then the Family Fun template, you can just fold and tape it to fit, that's what I did in the picture below.

Resized carton wallet template

Happy wallet-making everyone

Sunday, June 10, 2012

All about chip wrapper purses

If you are looking for a challenging upcycling craft - you need to try making a chip wrapper purse!

The idea is to empty chip bags and upcycle them into a purse.  I didn't actually know this was possible until a couple of weeks ago.  Since then I have found that there are many people successfully creating these purses and not wanting to be left behind, I got right to it.

After 3-4 'working' days, this is where I'm up to:


What you need to start your own purse:
1. Superb instructions from Mylinda's Wrapper Purse Blog
2a. Empty potato chip bags (+/- magazine pages)
OR
2b. I used old out-of-date booklets from my company, there were stacks of them waiting to be thrown into the paper recycling.
3. Dental Floss and Nan's Floss-tying instructions OR another type of strong thread.
4. An old credit card.
5. A lot of patience and time.
Instructions:
Seriously, just go to Mylinda's Wrapper Purse Blog, her instructions and accompanying photos are great. However, for the initial folding instructions, I recommend fluffyland, as I found their photos easier to follow.
 As you may or may not know, I am a family doctor and I work full time.  When I get home, there are kids to take care of and housework to complete, which is why even a few minutes at the end of a day in my office need to be taken advantage of for folding and joining...


I took these photos to show off my good start, my first 10 links in 5 minutes.. I considered that a good start.
My next photos, convey, why it took me a few hours, just to link up the first circle.
Totally Wrong
Totally Right

I will admit, that after realising how long this was going to take me, I almost gave up on the purse dream and settled for a bracelet instead, but I don't like giving up. So by sharing this craft with you on my blog, I am inviting you to start your own wrapper purse, and share your progress with me, and I'm also commiting myself to finish the purse, one way or another. 
If, despite my encouragement, you still aren't ready to commit to making a purse, you can use Terracycle's youtube instruction video to make a wrapper bracelet.


Happy wrapper-crafting everyone.

Tuesday, June 5, 2012

How to get an eco-friendly free signing time video

What is Signing Time?
Signing Time is a collection of videos that use music, songs and interesting visuals to teach American Sign Language (ASL).  Signing time is aimed at babies, hearing children, deaf children, children with special needs and anyone who enjoys music and wants to learn some ASL.

What is my Signing Time story?
When I was pregnant with my first daughter, I heard that teaching babies signing can be beneficial in various ways.  Babies can understand and have a will to communicate before their facial muscles are developed enough to speak.  By teaching them signs with their hands, they are able to communicate much earlier.  Babies that can successfully communicate (even on a basic level, "milk" "more" "no more" etc) will be less frustrated, which translates into less tantrums.  Additionally, owing to them already having developed skills of communication from a very young age, they often learn to speak earlier. 
When Eliya was born, I felt that there were many reasons to try signing with her.

However, I had very little background in Sign Language and although we signed up to an online program to learn sign language for babies, it wasn't really working.  Then, a friend of ours introduced us to Rachel Coleman and Signing Time.  We LOVED IT.  We bought the set of Baby Signing Time DVD's and watched them all the time.  We tried to incorporate signing while talking to Eliya, although we often forgot, and probably relied a little too much on the DVDs.


My husband and I are both South African born, English speakers.  We moved to Israel (made Aliya) and our children were born here, and placed in an Hebrew environment from a very young age.  Most bilingual kids, from what I've read and definitely from what I've seen amongst our bilingual friends, start speaking a little late and often have some difficulties.  My children, especially Eliya, both started speaking on the earlier side of the spectrum and I credit signing time with that.

If you're wondering why I'm crediting signing time and not myself (being the amazing mom that I am :-) ), I can give you a few reasons.  Firstly, Eliya's first words, were words that appear in the signing time DVDs.  Secondly, when a young child speaks, it can be difficult to decipher what they are saying and to differentiate when it's a 'baby babble' word or a real word.  In our family, we had to differentiate between 'baby babble', English and Hebrew.  This could have become very frustrating for Eliya.  Thanks to Signing Time, when Eliya realised that I didn't understand her word, she would just use the sign in conjunction with the word, and that would help me to decipher her sound.  This meant that her words could be understood which encouraged her to use more and more words and speak more and more. 
So Thanks Signing Time.

What does Signing Time have to do with Going Green?
Two Little Hands Productions are now offering a new convenient and eco-friendly way to purchase their videos - Signing Time on Demand. 
The manufacture of DVDs contributes heavily to pollution, and 1.6 billion dvd's go into landfills every year. With Signing Time on Demand, you can help your kids and save the planet while you're at it!
Basically the way it works is that you download the program for free, and can then buy Signing Time videos through the on Demand system and watch them on the computer without the need for a DVD.  Another plus is No Scratched/Broken DVDs !   Also, what I love is that through the on Demand system you can copy your videos to your iphone (no cables needed) and watch anywhere and everywhere on your phone.
For more info and to try a free introductory video, go to Signing Time on Demand.

Sunday, June 3, 2012

Cinderalla and the upcycling fairy godmothers

Two years ago, a very crafty friend of mine, decided to make princess costumes for our 2 year old daughters.  Never satisfied by simple, this friend decided specifically to make Cinderella and Aurora dresses, and to do it without spending any money. 

2011 - Eliya as Cinderella
2012 - Chana as Cinderella
Aurora's dress

How to make an upcycled princess dress:
Step One:  She posted on our community e-mail group that she was looking for pink and blue fabrics, and collected a used pink bridesmaid dress, cream tablecloth, and blue curtains.
Step Two: We followed the guidelines from make it and love it.  When I say we, I mainly mean she... because although I did 'help', I stuck to pinning, unpinning and cutting threads.
Tips to upcycling used fabrics:
Sleeve cuff from curtain tab top1.  Generally, we tried to use the seams that were already sewn in the curtains to our advantage, so that we had to do as little sewing as possible.
2.  The one aspect of the dress that I did do myself, was the cuffs for the sleeves, we used very flowy sleeves and I wanted a fitted cuff.  The blue fabric was originally a tab top curtain.  So I took the tabs, cut them and inserted a piece of elastic (the size of my daughter's wrist) and then sewed them closed again.
4.  The neckline was also upcycled, and we carefully folded blue ribbon for a finished neck.

After the Cinderella project, I got hooked on sewing.  I bought a sewing machine (well I convinced someone to buy it for me as a present) and decided on another upcycling project. 
Note:  I have very little sewing background, I did two years of sewing in high school on a basic level, but nothing more, so I'm not promising anything advanced here, just some encouragement that if I could do it, so can you.

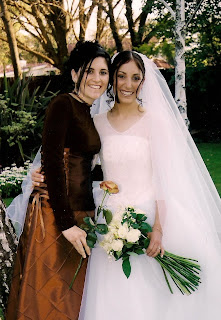
I have been a bridesmaid at six weddings, and as much as I enjoyed the experiences and love the brides, I was left with six bridesmaid outfits that I had little use for.  Some I gave away, some I still hope to wear and one I decided was destined for upcycling.


Eliya in her new upcycled dress
After
The bridesmaid dress before being upcycled
Before

Here is how I did it:
1.  I don't own any dress patterns, so I traced a design from another of my daughter's dresses.
2.  I cut the the fabric of the skirt, keeping the original hem, thereby avoiding extra work.
3.  I used the lining of the skirt for the top half of the dress.
4.  I bought matching thread, buttons and special folding tape which is used for the neckline, armholes and I also used it to join the upper and lower parts of the dress.
5.  The buttonholes.
Handsewed buttonholesThis is where I felt challenged, after watching my friend do the Cinderella zipper I knew there was no way I was trying that.  My sewing machine has a buttonhole feature, but after many many failed attempts I realised it wasn't as easy as the instructions claimed.  Even if I achieved, one good buttonhole, I would mess up the next one, and I needed three good buttonholes in a row.        And then I found craftstylish and tried handsewing buttonholes. - SUCCESSFULLY!


Happy upcycling everyone, please send me links/photos to your successful upcycling projects.